PayBot Setup Guide
Connect Stripe, verify your setup, and start monetizing your Discord server in under 5 minutes.
Table of Contents
Prerequisites
Before you begin the setup process, ensure you have the following:
Administrator Permissions
You must have Administrator permissions in your Discord server to run the /setup command.
Stripe Account
An active Stripe account is required. Create one for free if needed.
Bot Permissions
PayBot needs "Manage Roles" permission to automatically assign membership roles to subscribers.
Step 1: Connect Your Stripe Account
Securely connect your Stripe account to PayBot using Discord's OAuth flow.
Run the Setup Command
In your Discord server, type /setup in any channel where PayBot has permission to read messages.
/setupClick "Connect Stripe Account"
You'll see a "Connect Stripe Account" button in the setup interface. Click this button to begin the OAuth process.
Note: This redirects you to Stripe's secure authorization page. PayBot only requests access to create payment links and manage subscriptions on your behalf.
Authorize PayBot
On Stripe's page, review the permissions and click "Authorize" to grant PayBot access.
Security Note: PayBot uses Stripe Connect's secure OAuth flow. Your API keys are never shared - Stripe provides secure access tokens instead.
Return to Discord
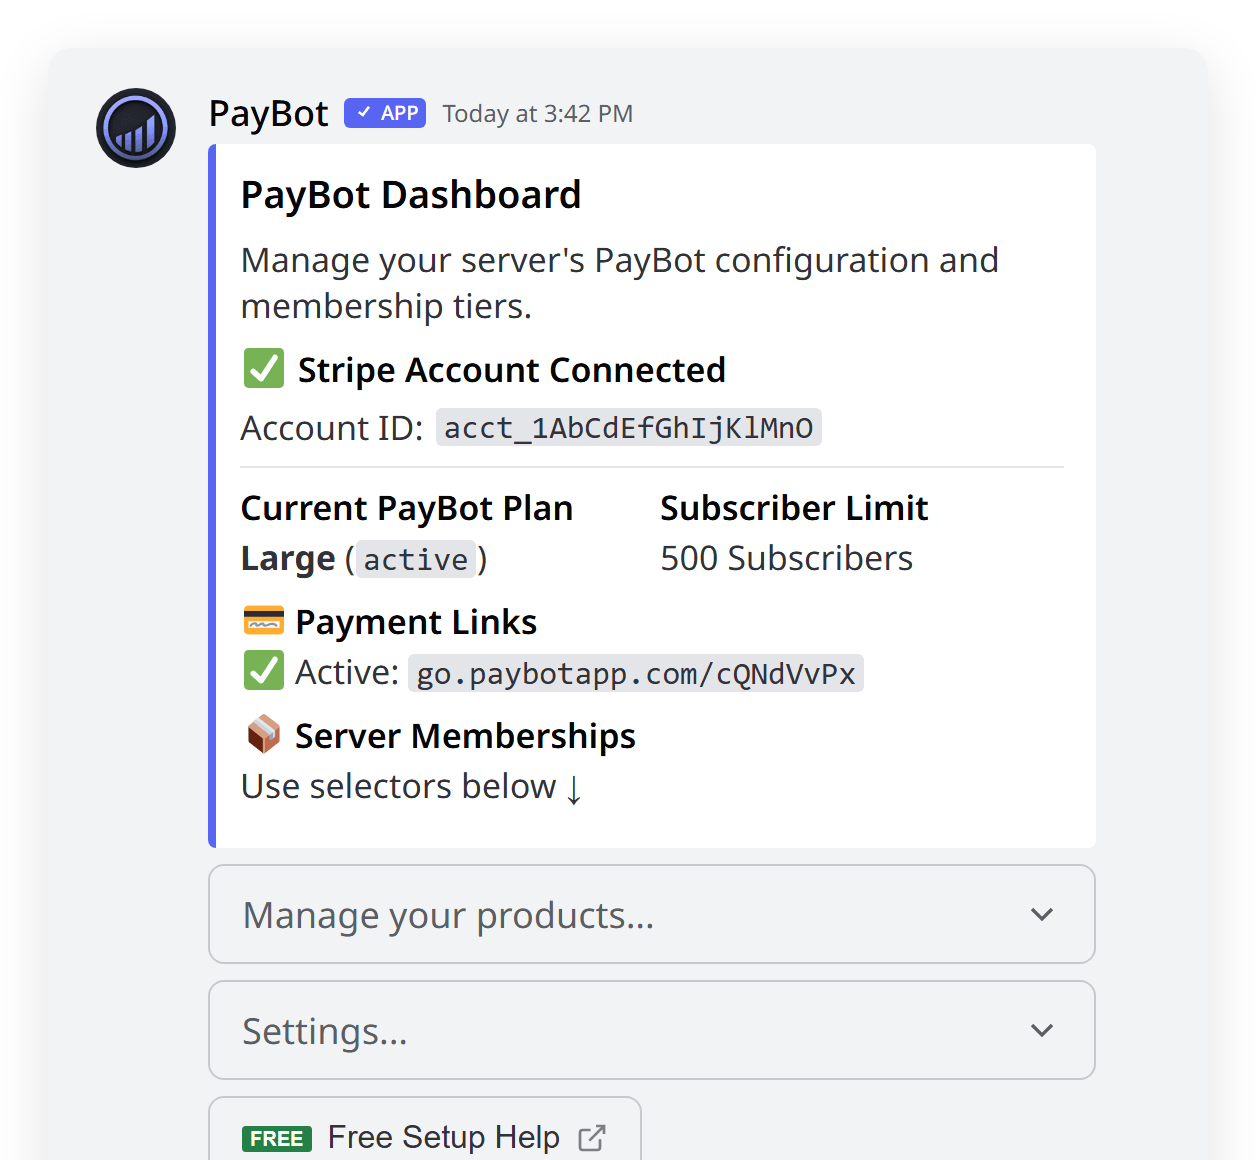
After authorization, you'll be redirected back to Discord. The setup interface will update to show your connected Stripe account.
Step 2: Verify Connection
Verify that your Stripe integration is working properly.
Click "Verify Connection"
In the /setup interface, click the "🔍 Verify Connection" button to test your Stripe integration.
Check Connection Status
PayBot will attempt to connect to your Stripe account. You'll see one of these results:
- ✅ Connected: Your Stripe account ID will be displayed with available features
- ❌ Connection Failed: Check your Stripe dashboard for errors or try reconnecting
Common Verification Issues
- Stripe Account Restricted: Complete Stripe's verification process in your Stripe dashboard
- OAuth Authorization Failed: Try the connection process again, ensuring you complete the full OAuth flow
Step 3: Understand PayBot Plans
PayBot offers four subscription tiers with different limits and features.
Free
$0/month
- ✅ Up to 3 subscribers
- ✅ Unlimited membership tiers
- ✅ Storefront & payment links
- ✅ Automatic role assignment
- ❌ No one-time payments
Best for: Small communities testing PayBot
Small
$9/month
- ✅ Up to 50 subscribers
- ✅ All Free features
- ✅ Subscriber management dashboard
- ✅ Automations (Zapier/Make/n8n)
- ✅ Analytics & reporting
- ❌ No one-time payments
Best for: Growing communities with monetization needs
Large
$89/month
- ✅ Up to 500 subscribers
- ✅ All Small features
- ✅ One-time payment options
- ✅ Affiliate commission payouts
- ✅ Priority support
- ✅ Advanced analytics
Best for: Large communities with serious monetization
Ultra
$399/month
- ✅ Unlimited subscribers
- ✅ All Large features
- ✅ Team payroll for community managers
- ✅ Dedicated support
- ✅ Custom integrations
Best for: Massive communities at scale
How to Upgrade Your Plan
- In
/setup, click "Upgrade PayBot Plan" - Select your desired plan (Small, Large, or Ultra)
- Complete payment on Stripe's secure checkout page
- Your plan updates automatically after successful payment
Note: Plan changes are prorated - you'll only pay the difference for the remaining time in your billing cycle.
Step 4: Configure Bot Permissions
Proper Discord permissions are crucial for PayBot to function correctly.
Required Permissions
- Manage Roles - For automatic role assignment
- Send Messages - To respond to commands
- Use Slash Commands - For /setup and /subscription
- Embed Links - For rich embeds in responses
Role Hierarchy Setup
Critical: PayBot's role must be positioned above all membership roles in your server's role hierarchy.
- Go to Server Settings > Roles
- Find PayBot's role in the list
- Drag PayBot's role above your membership roles
- Ensure:
PayBot > Premium Role > Basic Role > @everyone
⚠️ Important: If PayBot's role is below membership roles, it cannot assign them to users.
Step 5: Test Your Setup
Before launching to your community, test that everything works correctly.
Create a Test Membership Tier
Create a low-cost test tier (e.g., $1.00) that you can use for testing.
Test Role Assignment
Have a friend or alt account subscribe and verify the role is assigned correctly.
Test Cancellation
Test the cancellation flow to ensure roles are removed properly.
Verify Stripe Integration
Check your Stripe dashboard to confirm payments are being recorded correctly.
Pre-Launch Checklist
- Stripe account connected and verified
- Bot permissions configured correctly
- Role hierarchy set up properly
- Test payment completed successfully
- Membership tiers created and configured
- Community notified about new payment system
Common Issues & Solutions
❌ Stripe Connection Failed
Possible Causes:
- Stripe account is restricted or requires verification
- OAuth authorization was cancelled or failed
- Network connectivity issues
Solutions:
- Check your Stripe dashboard for restrictions
- Try the connection process again
- Contact Stripe support if account is restricted
❌ Roles Not Being Assigned
Possible Causes:
- PayBot's role is below membership roles in hierarchy
- Bot lacks "Manage Roles" permission
- Role no longer exists or was deleted
Solutions:
- Move PayBot above membership roles in Server Settings
- Ensure PayBot has "Manage Roles" permission
- Recreate the role if it was deleted
❌ Payment Button Not Working
Possible Causes:
- Stripe account not properly connected
- Server reached subscriber limit for current plan
- Membership tier is archived or inactive
Solutions:
- Use
/setupand click "🔍 Verify Connection" - Check your current plan limits in
/setup - Ensure the membership tier is not archived
❌ Can't Create One-Time Payments
Possible Causes:
- Not subscribed to Large plan ($89/month)
- Feature not enabled for your account
Solutions:
- Upgrade to Large plan using
/setup - Contact support if you have Large plan but feature isn't available
Need More Help?
If you're still having issues after trying these solutions:
- Check the Troubleshooting Guide for detailed solutions
- Join our Discord support server for community help
- Contact our support team for personalized assistance
What's Next?
Now that PayBot is connected, explore the features available on your plan:
Core Features (All Plans)
- Create Membership Tiers — Set up recurring and one-time pricing
- Build Your Storefront — Customizable portal page for your community
- Share Payment Links — Direct checkout URLs for each tier
- Configure Roles — Automatic Discord role assignment
- Organize Tier Groups — Enable seamless upgrades/downgrades
- Set Up Welcome DMs — Custom messages for new subscribers
- Gift Free Time — Reward subscribers with free months
- User Data & Privacy — GDPR-compliant data management
Advanced Features
- Manage Subscriptions — Monitor and manage your subscribers
- Set Up Automations — Webhooks for Zapier, Make, n8n (Small+)
- Launch Affiliates — Reward referrals with commissions (Large+)
- Migrate from LaunchPass — Import existing Stripe subscribers